Last update: 10/23/2017
Prerequisites
This guide assumes that you have already added funds to your account via a top-up. If you have not, please add funds before proceeding as many of the steps below will fail without an account balance.You also will need a copy of the Debian Network Install CD image for amd64. This image is available directly from the Debian site.
Finally, you will need access to a secure Linux computer on which to build the client utility and from which to access the leased cloud system(s). While we intend to support other client platforms in the future, and, in fact, mticlient may build and operate correctly on other platforms, such as BSD or macOS, Linux will be used exclusively for this tutorial.
Client Setup
Download a copy of the current mticlient public source code to your local Linux computer. This is the utility you will use to securely connect to your leased IntegriCloud™ system(s), and, as such, we strongly encourage that you take a moment to look through the source code and make sure that you are comfortable trusting it with access to your data and passwords. Also install a copy of sshpass from source or from your distribution's package manager; mticlient uses sshpass internally to establish a connection to the remote server.Extract source code
Build and install libflexver
Build and install mticlient
Import auditor public key(s)
To establish a chain of trust for its leased system offerings, IntegriCloud™ relies on GPG signed statements from individuals, teams, and/or organizations that have audited the FlexVer™ provisioning process for a given node or nodes. You will need to import the GPG public keys of these individuals to verify the integrity of the remote IntegriCloud™ systems. We maintain a list of auditor GPG keys for your convenience. Please remember that you should only import the keys of auditors that you trust, and validate these keys with a given auditor out of band if high security is paramount.
Download a key or keys for auditor(s) that you want to trust, then import each key to your GPG keyring as follows
Set up default trust lists
mticlient verifies the remote IntegriCloud™ systems in four different ways. The lowest level root of trust is the FlexVer™ cryptographic key, which is internally generated by FlexVer™ at provisioning in a secure environment and cannot be duplicated. As such, each IntegriCloud™ node will report a different public key for its internal FlexVer™ system. Three other data values are provided: the FlexVer™ system hash, the system boot firmware hash, and the MTI firmware hash. A signed audit log for each of the FlexVer™ public keys is maintained on our public API and used automatically by the mticlient program, while the other three hashes may be compared against lists of known good hashes maintained on the client.
Because the firmware is reproducible, the safest way to generate known good hash lists is to compile the firmware from source; however, we also maintain lists of known good firmware hashes that can be used where overall system security is less important. In all cases, the miticlient program expects to find the three hash list files in ~/.integricloud or in /etc/integricloud; if the hashes are not present, mticlient will not attempt to validate the hashes provided by the remote FlexVer™ system. We make no guarantees as to the correctness of the published hash lists and do not warrant them against tampering; production systems should use hashes generated via a reproducible build.
For this tutorial, download the three hash lists from the link above and place them in your ~/.integricloud directory. Verifying their correctness via reproducible builds of the system firmware is left as an excercise for the reader.
Cloud Setup
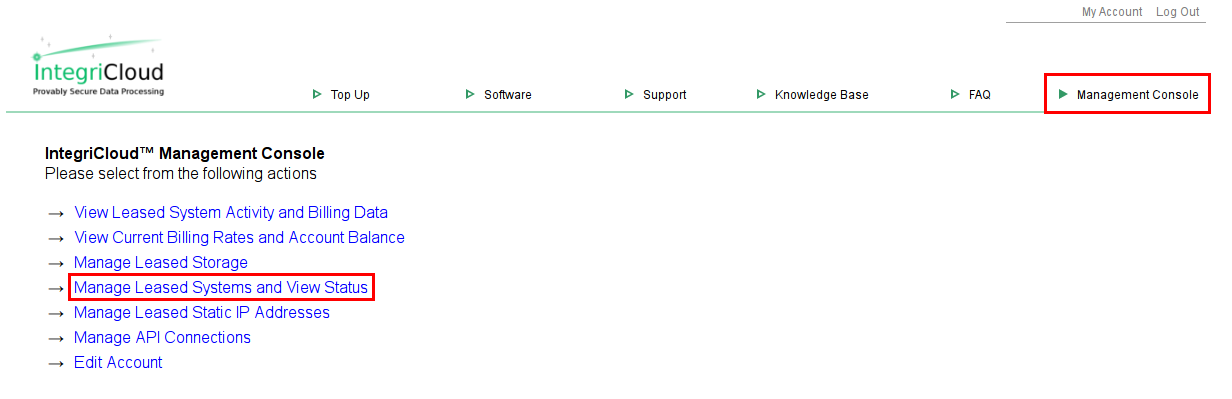
Create New Leased SystemNavigate to the Management Console on the IntegriCloud™ site, then select "Manage Leased Systems and View Status."
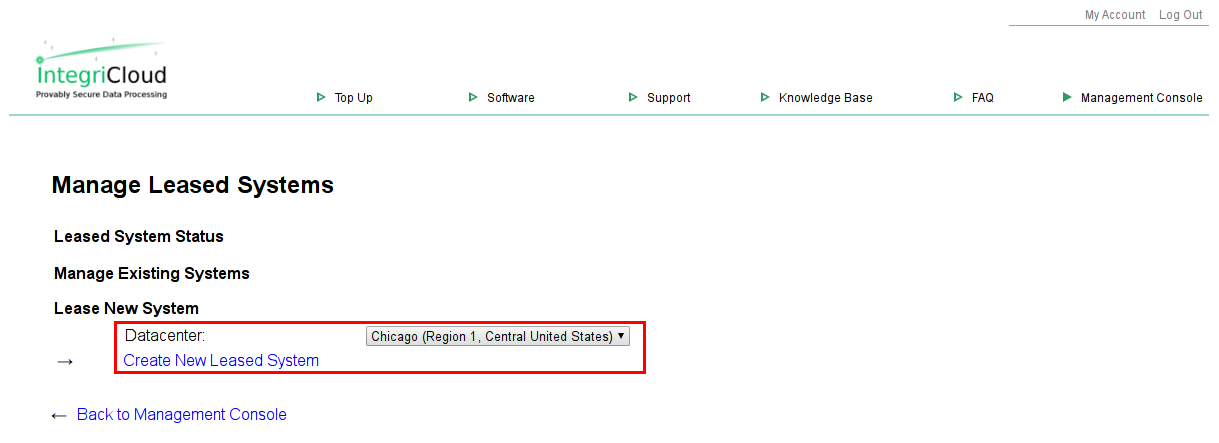
Select a datacenter, then click "Create New Leased System."
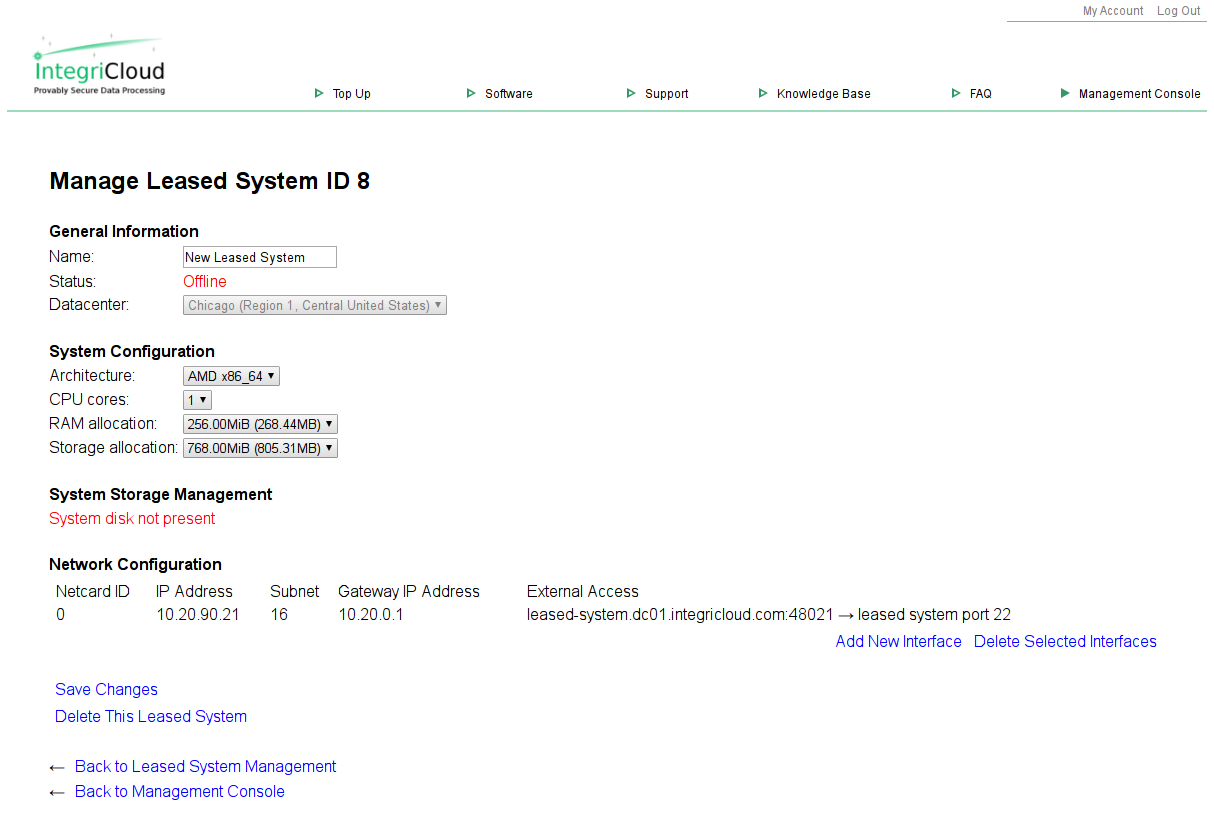
You will now see the leased system management screen. On this page you can make changes to the resources used by the new leased system. Note the "System disk not present" notation; we will create a system disk for this leased system later in the current tutorial. Please retain the system ID for future use. In this example, the system ID is 8, but it will be different in your case.
For this tutorial we strongly recommend increasing the RAM allocation to 1024MiB and the storage allocation to 4GiB to allow Debian enough resources to install. Note that RAM settings lower than 640MiB will not allow the Debian 9.x installation CD's kernel to load, instead dropping back to the Petitboot menu or hanging the leased system. Click "Save Changes" after selecting the appropriate drop-down list items to set the new resource allocations.
Upload Debian Network Install ISO Image
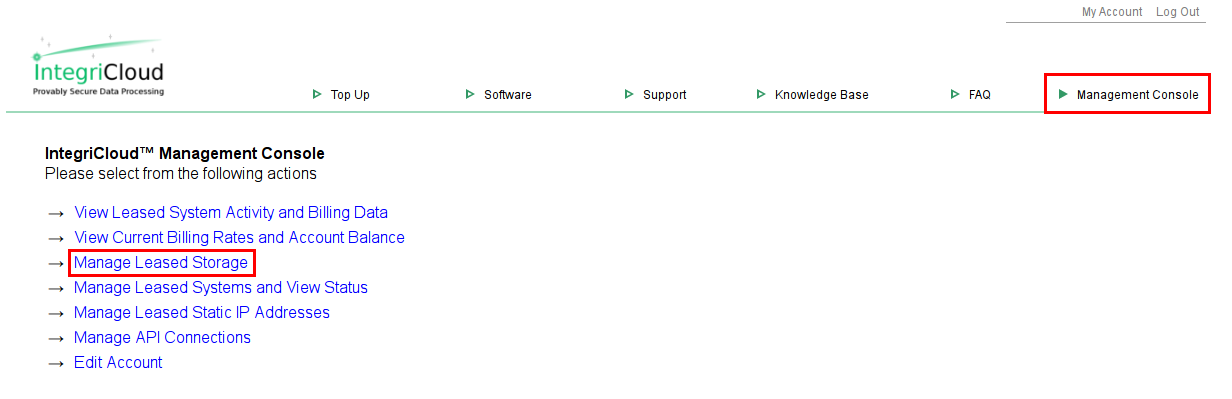
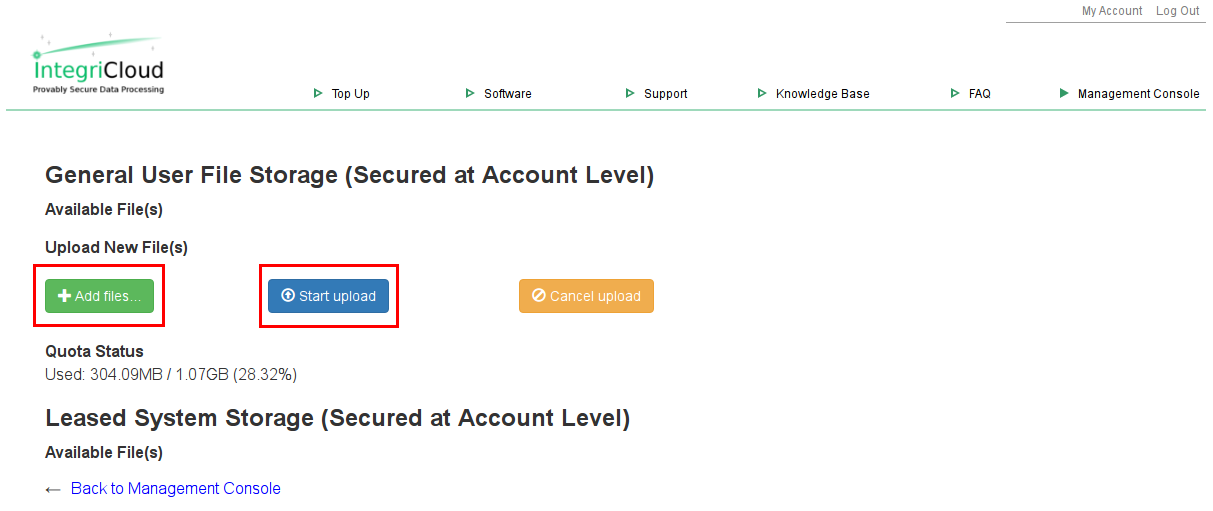
Navigate to the IntegriCloud™ Management Console, then select "Manage Leased Storage."
Click "Add files," then select the Debian Network Installer image you downloaded earlier. Select "Start upload," then wait for the upload to finish before continuing.
Log in to IntegriCloud™
On your secure Linux computer, execute
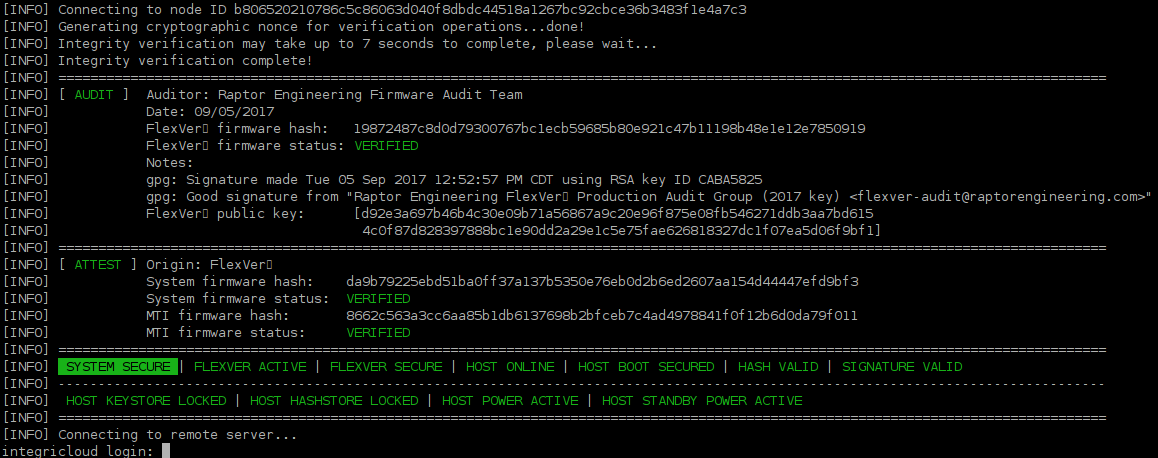
Verify that the system state is secure, then log in with your IntegriCloud™ user ID and password. You may use the "help" command to receive a list of all available commands within the IntegriCloud™ shell.
Configure the Secure Environment
For maximum security, IntegriCloud™ uses a session codeword to ensure that only you have access to the console of each leased system. This codeword can be set for a single session, or provided on a case-by-case basis. Failure to set the codeword means that if, for instance, your connection is dropped while you have a root shell on the leased system, any attacker knowing your IntegriCloud™ username and password could gain root access on the leased system. Setting a session codeword prevents this from happening, and also prevents an attacker from updating the list of allowed migration destinations in an attempt to migrate your leased system onto a malicious node.
From within the mticlient application, execute
and follow the prompts. A unique, memorable codeword consisting of several words is advised for security reasons.
Load the Debian Installer ISO Image
Each IntegriCloud™ node has access to the general user file storage area. For security reasons, after a file has been transferred to a particular node, it should be hashed and the hash compared against a known good hash of the file. IntegriCloud™ provides functions to make this as simple as possible.
From within the mticlient application, execute
Format the Leased System Disk
The system disk of the leased system must be initialized before first use. Note that initalization is a destructive operation; it should only be executed for leased systems that you wish to restore to a pristine, blank state.
From within the mticlient application
and follow the prompts.
Launch the new Leased System
IntegriCloud™ uses a screen-like serial terminal system for local console access. Boot parameters may be given when launching a leased system, including parameters to specify a CD/DVD file and to automatically attach the local console to the current screen. IntegriCloud™ currently uses the Petitboot loader; this provides a TUI (Text-mode User Interface) from which the boot process may be configued.
From within the mticlient application
After a short delay you should see the petitboot TUI menu. Please use the Up arrow to halt the automatic boot countdown, as the default settings will not function correctly. If you miss the timeout and end up with a black screen, type CTRL+Q to detach the IntegriCloud™ session from the leased system terminal, then execute
to forcibly terminate the leased system.
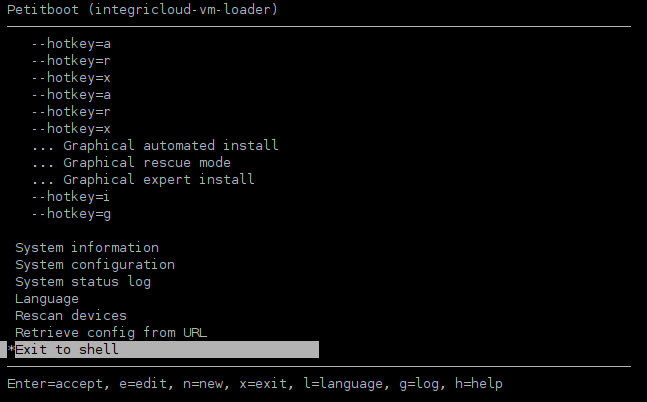
Note that in this case Petitboot has some minor issues parsing the Debian ISO boot menu; it displays the hotkey arguments instead of the friendly labels of the Debian boot menu. This is being worked on and is expected to be resolved in the near future.
Launch the Debian Installer
Because IntegriCloud™ provides a serial terminal interface instead of a VGA graphical terminal, you will need to append a kernel boot argument to the installer in order to successfully boot. Use the arrow keys to navigate to the "--hotkey=s" entry, then type "e". Use the arrow keys to navigate to the "Boot arguments" field, then replace the entire contents of that line with
Use the arrow keys to navigate to the "OK" option, then press <Return>. Press <Return> again to launch the installer.
Install Debian
If all went well, after a short delay you should see the Debian Installer TUI. You may complete the installation per normal procedures. Please note that there is no DHCP server in the IntegriCloud™ leased system environment; you will need to configure your network interface(s) with the settings shown on the leased system management page for the given leased system ID. We recommend using a public nameserver, such as Google's public server 8.8.8.8, for DNS lookup.
To receive the full benefits of the IntegriCloud™ security model you must use the disk encryption option in the installer. If you leave your system disk unencrypted, it becomes trivial for anyone with access to the IntegriCloud™ network and/or your IntegriCloud™ login information to access and/or tamper with your data. We also recommend hashing the system disk after shutdown with the hash_vm_system_disk command, and saving this hash locally for comparison at next startup. This is to verify that your Linux kernel and initrd (or other boot files on alternative operating systems) have not been tampered with and are safe to use for disk decryption. If there is any doubt as to the authenticity of these files, we recommend that you download a copy of the system disk for local verification of the boot partition before proceeding with disk decryption.
Launch the Newly Installed System
After installation is complete, shut down the leased system and relaunch with the following command
As before, because IntegriCloud™ provides a serial terminal interface instead of a VGA graphical terminal, you will need to append a kernel boot argument in GRUB in order to successfully boot. Use the arrow keys to navigate to the "Debian GNU/Linux" entry, then type "e". Use the arrow keys to navigate to the "Boot arguments" field, then append the following text to that line
Use the arrow keys to navigate to the "OK" option, then press <Return>. Press <Return> again to launch your new system.
We strongly recommend editing /etc/default/grub and appending the console lines above to the existing GRUB_CMDLINE_LINUX_DEFAULT variable. After updating that file, run update-grub to write the changes to disk.
When done configuring your new system, you may use CTRL+Q to detach the IntegriCloud™ session from the leased system terminal and keep the leased system running in the background. Should you wish to reattach to the running leased system, simply execute
from within the mtishell client.
Closing Notes
If you have installed SSH on the leased system, you can access the leased system outside of the mticlient application at the port number listed on the "Manage Leased Systems and View Staus" page. For example, for the system shown above, the following command would connect via SSH to the leased system:
If you need to allow connections other than to the leased system's SSH server, you can lease one or more public IPs via the "Manage Leased Static IP Addresses" option on the IntegriCloud™ Management Console, then enable them via the "Manage Leased Systems and View Status" option.
Full system disk upload and download are provided as part of the base service level. Once you have completed this installation process, we suggest saving a copy of the system disk locally for rapid deployment of cloned systems in the future. The sky's the limit with IntegriCloud™ — take advantage of its power, security, and advanced features today!
All data and information provided on this page is for informational purposes only. Raptor Data Solutions, LLC makes no representations as to accuracy, completeness, currentness, suitability, or validity of any information on this page and will not be liable for any errors, omissions, or delays in this information or any losses, injuries, or damages arising from its display or use. All information is provided on an as-is basis. All product names, logos, and brands are property of their respective owners. All company, product and service names used in this page are for identification purposes only. Use of these names, logos, and brands does not imply endorsement.
Site design, contents, and implementation copyright © 2025 Raptor Engineering, LLC. All rights reserved, used under license.
This product is covered by one or more U.S. patents or patent applications. Unauthorized duplication of any component, in part or in whole, is strictly prohibited.
This website makes minimal use of cookies. Use of this site constitutes acceptance of this policy. Terms and conditions of use. / contact information. v2.02.3